
 a Chicken Coop " width="677" height="2560" />
Once you have decided you want to raise chickens, you will have many questions:
A chicken coop is a home for your hens. Somewhere to keep them safe from predators, warm during winter, dry during rain, and somewhere safe to lay eggs.
It all starts with the right coop for your hens with step-by-step instructions for those ready to take the DIY chicken coop plunge.
Don’t panic! Take a deep breath. Building your own chicken coop does not have to be complicated or cost lots of money.
In this article, we share my most recent experience of building one and a guide for you to build your own too.

Chapter 1

Chapter 2
Designs and Plans

Chapter 3
Tools and Materials Required
 a Chicken Coop" />
Chapter 4
How to Build a Chicken Coop

Chapter 5
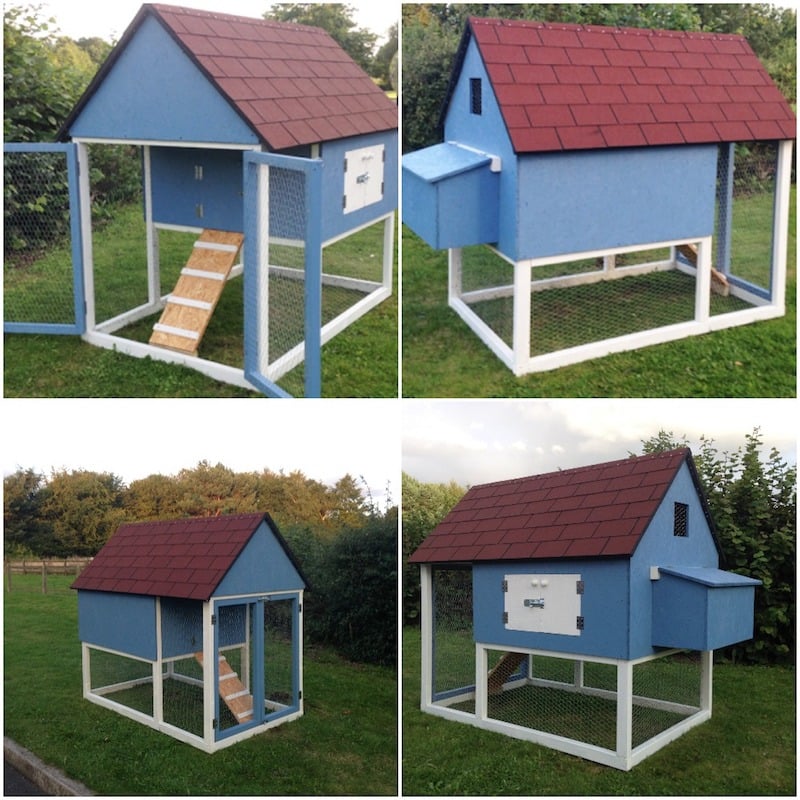
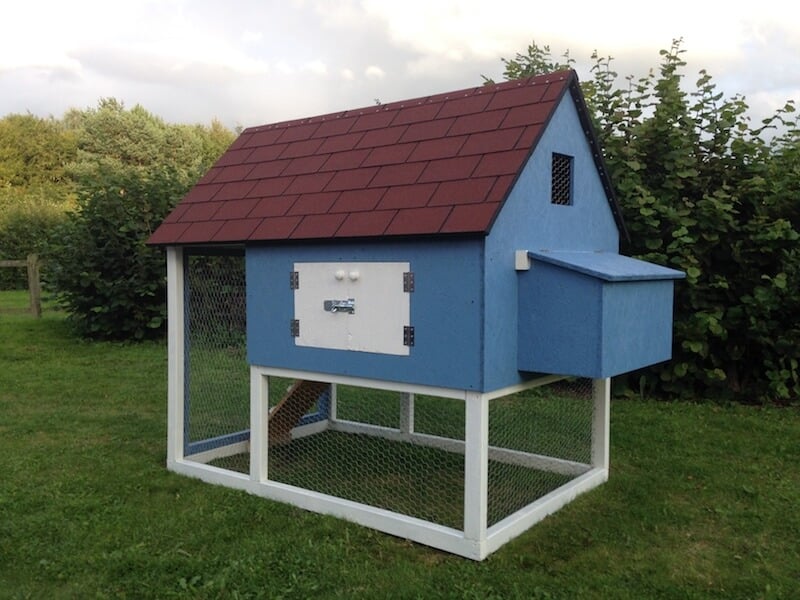
Finished Coop Pictures
When it comes to building your own coop, there are many advantages.
The first of which being you can build a coop to your and your hens’ exact needs. Want an extra nesting box, perch, or more floor space? – easy, build it yourself!
You will also save money, have fun, and be able to modify your coop in the future; if your flock requires changes.
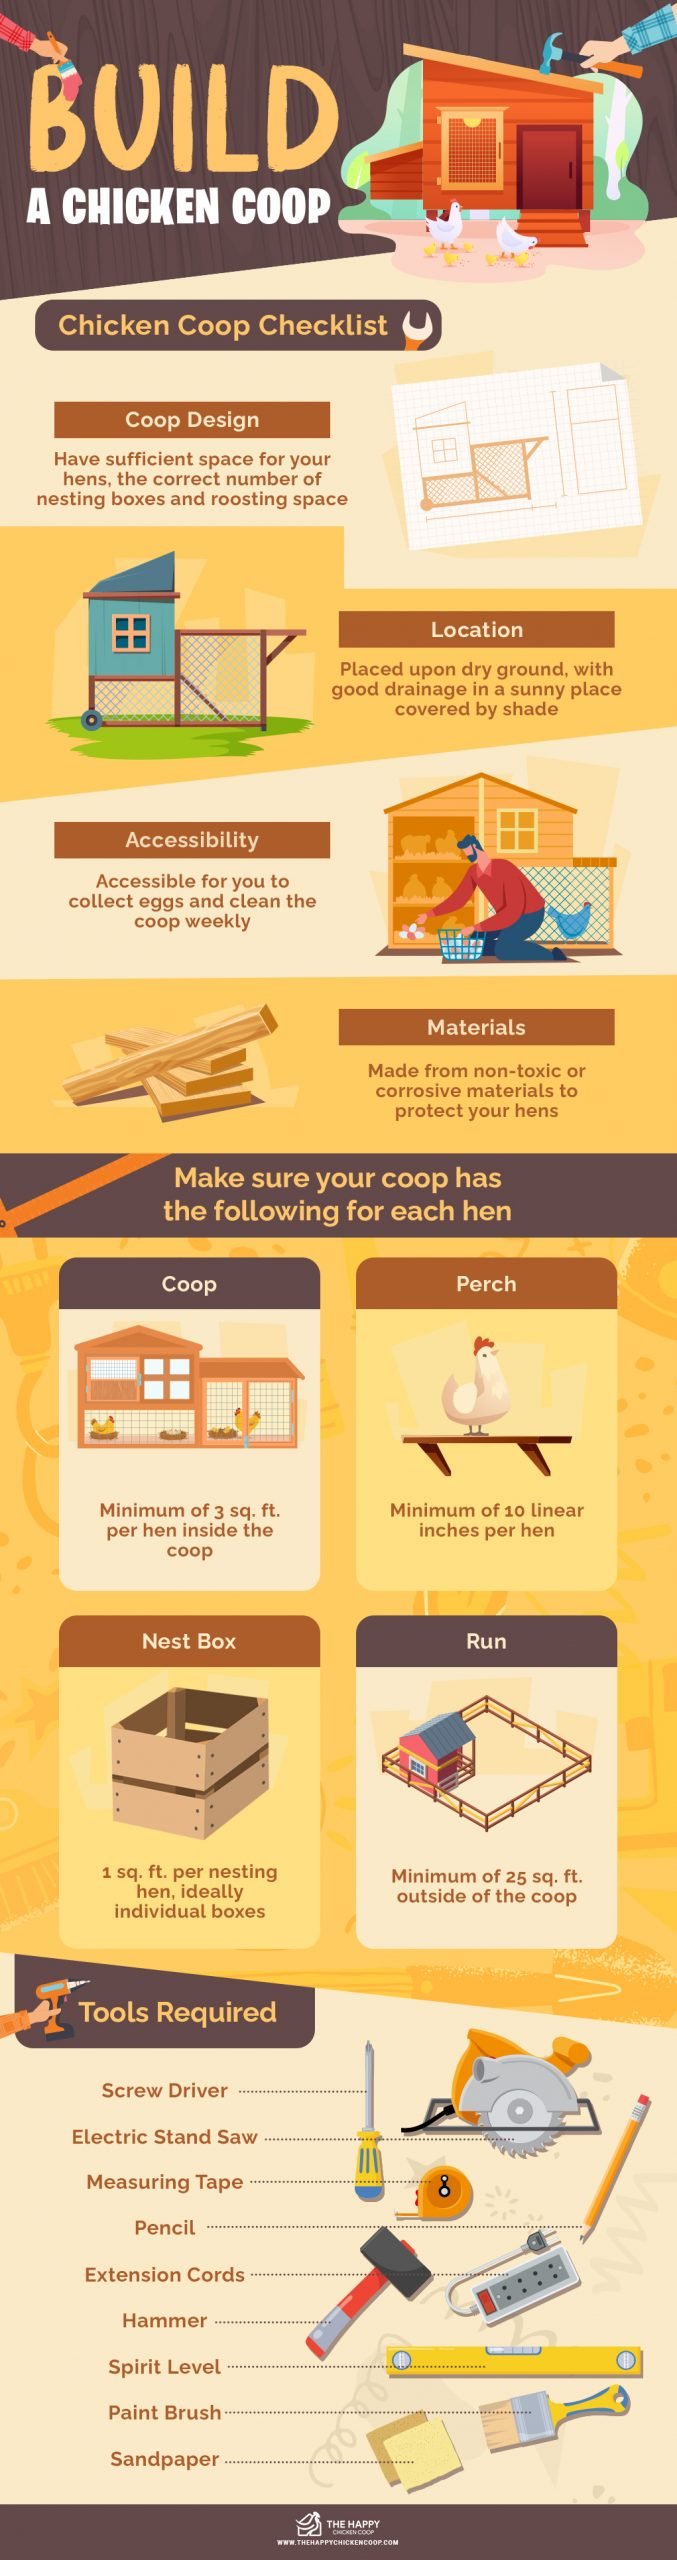
When building your own coop, you will want to print off this handy checklist below to make sure you build the perfect home for your hens.
| Item | WHY? |
|---|---|
| Coop Design | Must have sufficient space (i.e. square feet) for your hens, the correct number of nesting boxes, and roosting space. Should be robust enough to prevent predators from gaining entry and draft-free (i.e. keep elements out). |
| Location | Must be placed upon dry ground, with good drainage in a sunny place covered by shade. Should provide a good airflow (i.e. light breeze) to your coop to enable ventilation within the coop. |
| Accessibility | Should be very accessible for you to collect eggs and clean the coop weekly. |
| Materials | Must be made from non-toxic or corrosive materials to protect your hens. |
Backyard chicken coop plans can range from small to large, a-frame to barn designs, and many more variations.
The most common style and configuration is a traditional coop, with exterior nesting boxes and an open gable roof.
The most important factor amongst all the variety of sizes, shapes, and styles is to build a coop that works for you and your hens.
The best advice is to browse lots of different coop plans. We have collected 44 free chicken coop plans; all of which have easy-to-follow instructions and will make selecting a coop design much easier.
Whilst browsing the plans, note down the differences and what you like about them. Once you have selected a plan, remember these important tips:
You should make sure your coop has the following for each hen.
| Title | Size |
|---|---|
| Coop | Minimum of three square feet per hen inside the coop (increase this to five if they are not free-range. |
| Perch | Minimum of 10 linear inches per hen. |
| Run | Minimum of 25 square feet outside of the coop. |
| Nest Box | One square foot per nesting hen, ideally individual boxes. |
The fastest and easiest material to build your coop from is wood.
All of the materials required are referenced in each stage as a “cut list”.
However, you have probably heard of DIYers making coops from just about anything; wooden pallets, corrugate roofing, and rubber tires.
I would recommend you stick to the basics. Wood is cheap, fast to build with, durable, and easy to paint. Before starting to build your chicken coop, you should prepare a list of all the tools required.
I have listed below the tools I used recently to build my own coop.
Below, I’ve included a step-by-step guide with pictures that will make building a coop easy for someone without any DIY experience.
The Chicken Coop You Will Learn How to Make

Finished Coop Frame
Once you have chosen your design, the first stage to making your coop is to build the frame. The frame is the structure of your coop.
Step 1: Build Two Sides of Your Coop
| Name | QTY and Size |
|---|---|
| Side Batten | 4 x 72”x3”x2” |
| Vertical Batten | 6 x 42.5”x3”x2” |
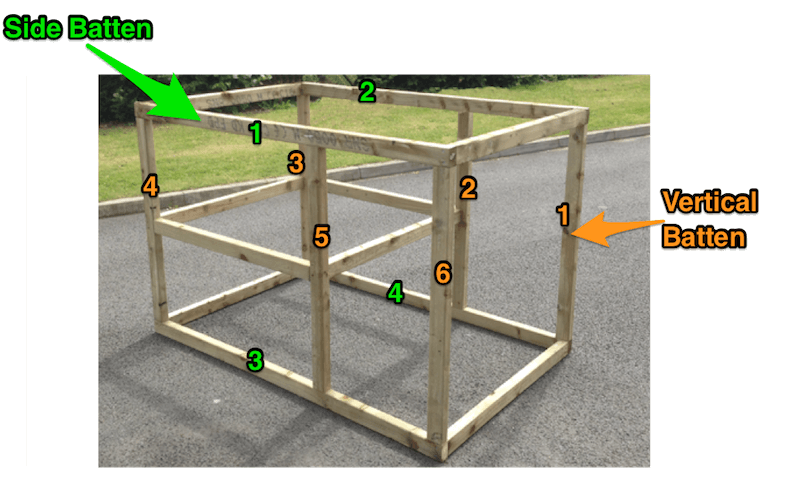
Once you have cut the side and vertical battens, fix them together with screws making sure the side battens run parallel and vertical batten 5 and 2 are fixed 21” from vertical batten 6 and 1 (see diagram below).
Top-Tip!
To make sure the side of the frame is square, place it on a flat surface and measure across the diagonal of the frame.
You should measure both of the diagonals (top right to bottom left and top left to bottom right) to check that the diagonal lengths match.
Step 2: Joining Sides Together
| Name | QTY and Size |
|---|---|
| Connecting Batten | 4 x 42.5”x3”x2” |
| Lower Lumber Batten | 4 x 42.5”x3”x2” |
To join the sides together you will need to fix all 4 connecting battens on the inside of each joint. Screw through from the side battens into the connecting battens.
Finally, fix the 4 lower lumber battens on the outside of vertical battens 2,3,4 and 5 approximately 19.5” from the floor.
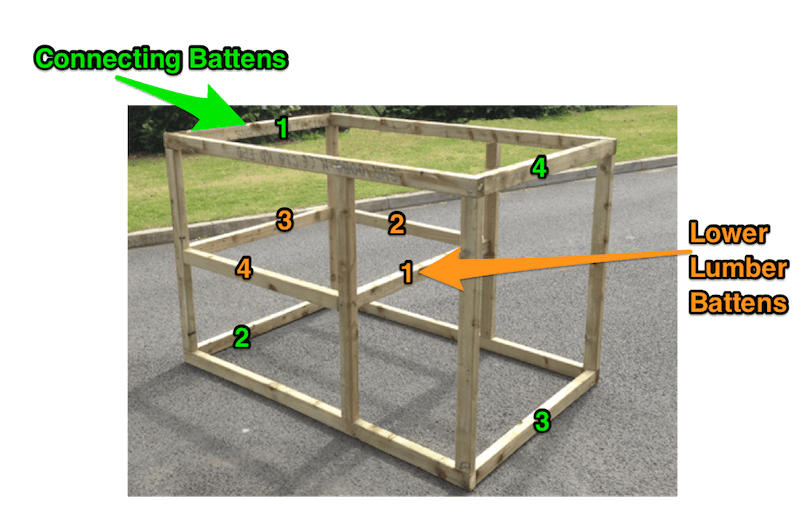
Congratulations, you have now completed your coop frame.
Now you have completed the frame of your coop, it’s time to build the roof. Let’s start by making and fitting the roof trusses.
| Name | QTY and Size |
|---|---|
| Roof Trusses | 6 x 32”x3”x2” @ 45-degree angle |
Take two roof trusses (battens) and screw them together through the 45-degree angle to create triangles (without bases).

| Name | QTY and Size |
|---|---|
| Large Ridge Rail | 1 x 43”x3”x2” |
| Small Ridge Rail | 1 x 23”x3”x2” |
To complete the roof structure, simply screw the large and small ridge rail in-between the roof trusses with the 3” section of the rail on the right side.
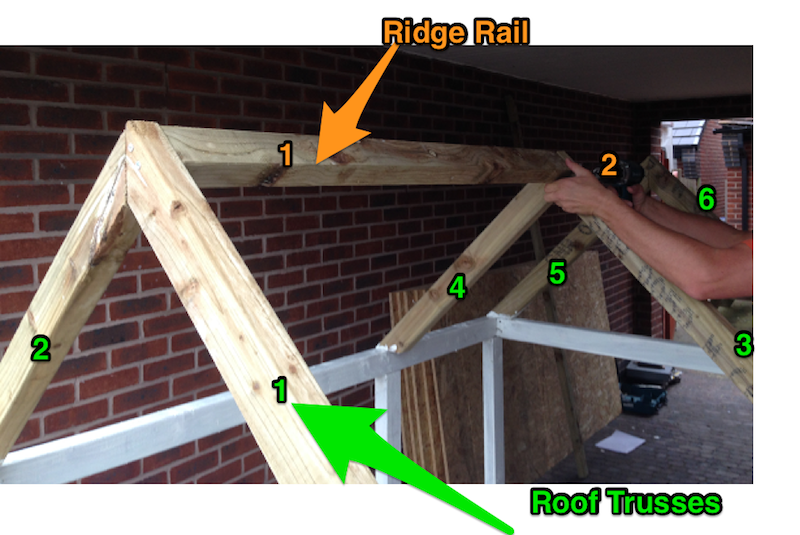
Screw through the roof trusses into the ridge rails.
Congratulations you have now completed the roof frame of your coop. You will no doubt be able to see it taking shape and can already picture your hens in there!
I decided at this point to paint the frame of the coop (excluding the roof trusses), as it’s much harder to paint when all the panels have been fitted.
It’s now time to fit the roof panels and coop frame panels. At the moment, you have a skeleton of a chicken coop.
Once you have cut and fitted the panels you will have a complete coop!
| Name | QTY and Size |
|---|---|
| Roof Panels | 1 x 76” x 37” 1 x 76” x 36” |
Take two Oriented Strand Boards (“OSBs”) and cut them to the sizes above. After you have finished cutting the panels, use a piece of sandpaper to smooth down any splinters and rough edges.

Now the coop frame has been built and your roof is fitted, let’s start to panel the frame of the coop.
| Name | QTY and Size |
|---|---|
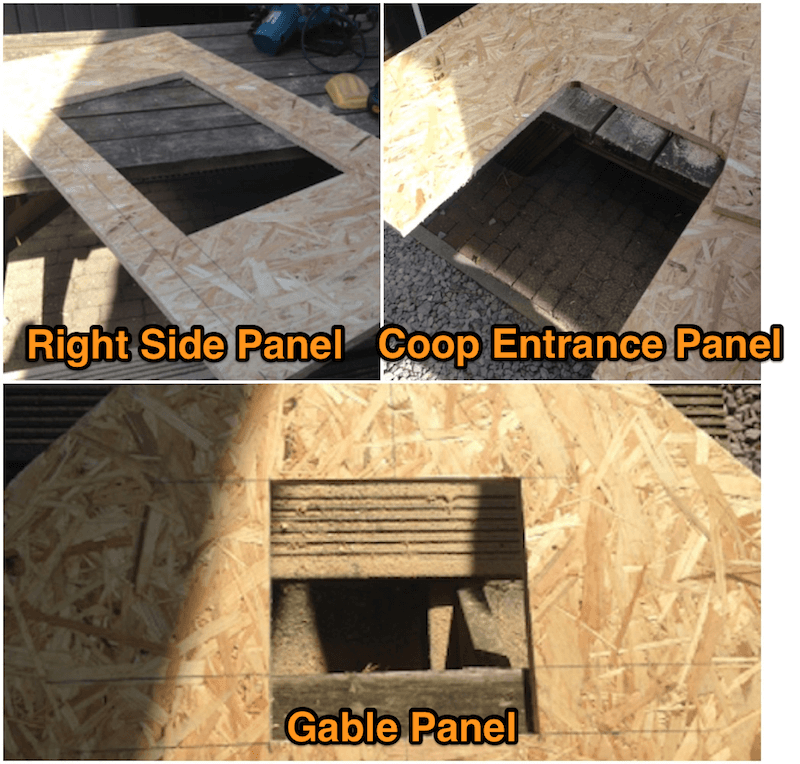
| Side Panel | 2 x 48” x 23” |
| Floor Panel | 1 x 47” x 46” |
| Gable Panel | 1 x 48” x 46” |
| Coop Entrance Panel | 1 x 42” x 43” |
| Front Panel | 1 x 46” x 24” |
Cut the 5 panels required using the sizes specified above. After you have finished countersinking the side panels, you can screw them to the coop.
Once the side panels are fitted, you are going to fit the floor panel into your coop. Now the floor has been inserted, screw the floor panel into the frame of the coop.

Proceed to countersink and then screw the floor into the frame.
Now it’s time to fit two more panels into the coop.


Once the coop has been paneled it is time to cut all of the openings into the panels; such as the coop door, nesting box, and cleaning access:
Now you have a finished coop, but, without the detail. The final touches are the most important ones!
| Name | QTY and Size |
|---|---|
| Vertical Door Batten | 4 x 42”x1¾”x1¾″ |
| Horizontal Door Batten | 4 x 17½”x1¾”x1¾″ |
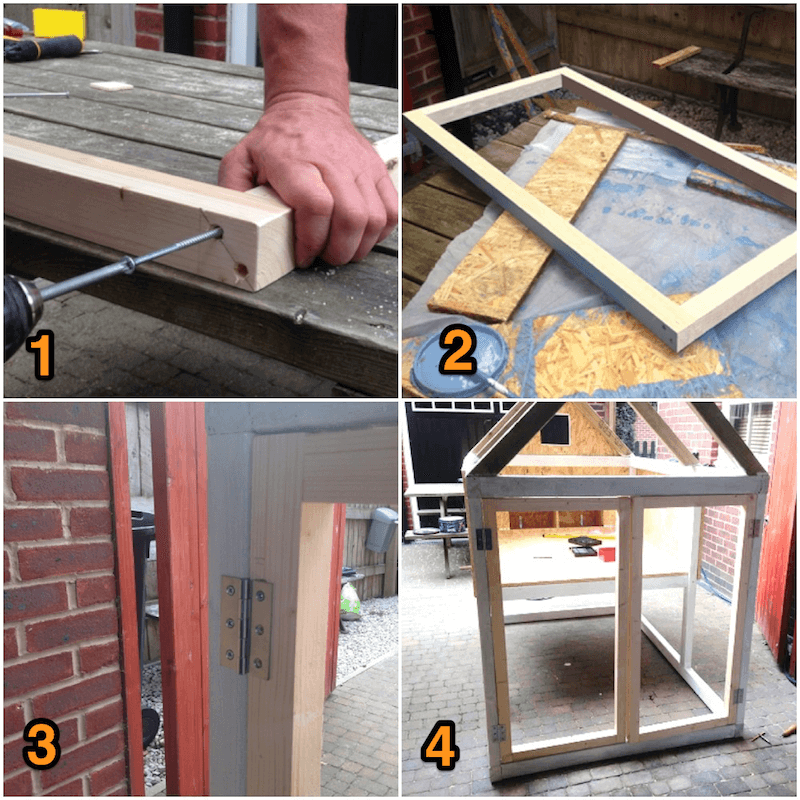
Once you have your battens cut to size you can make the coop doors.
Each coop door is made from two vertical door battens and two horizontal door battens.
Take a horizontal door batten and on each end apply PVC glue. Next, take a vertical door batten and screw through the side of the vertical door batten into the horizontal door batten. Repeat this process for both sides of the door.
You now need to repeat this process to make your second door.
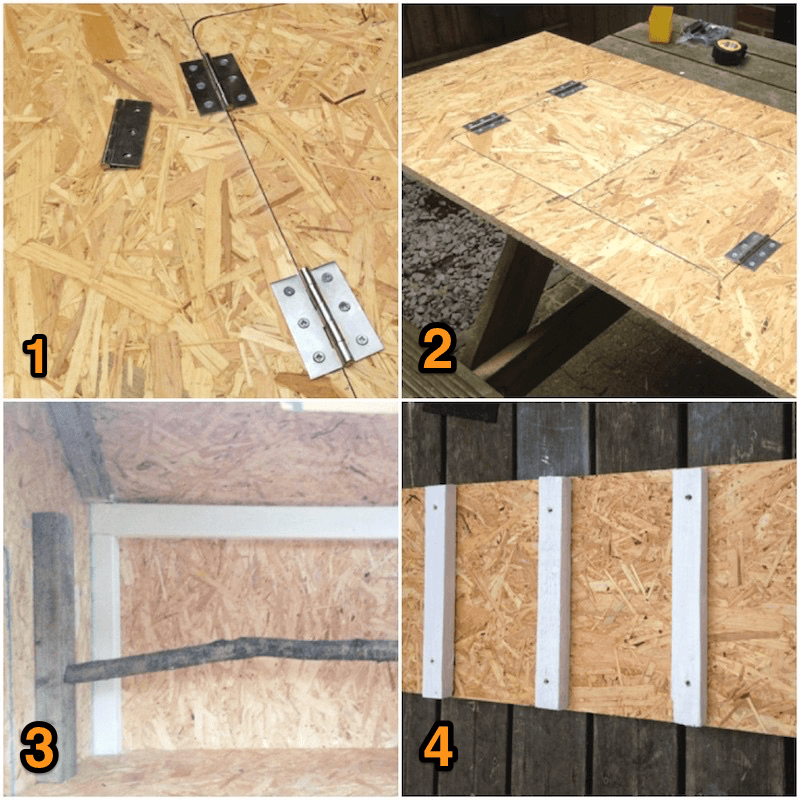
Once you have built the doors, they will need hanging. To hang the doors, you need to fit the hinges to the doors and then to the frame of the coop.
 a Chicken Coop" width="800" height="800" />
Your chicken coop is really starting to take shape!
It’s time to build the nesting box.
We’ve previously written in-depth about different styles of nesting boxes and how to build one here.
Let’s begin by fitting the entrance door to the coop entrance panel.
Remember the piece of wood you cut out of the coop entrance panel?
Grab it, add a couple of hinges and you have a small door for your coop.
Now the coop entrance panel is complete, let’s turn our attention to the side panel. You will want to take the right-side panel where you previously cut a door opening. Grab it, add a couple of hinges and you have a small access door for your coop.
You can choose to add barrel bolts to both doors to fix them in place.
When I was building the coop, I wanted to make the roost as natural as possible, so I decided to make the roosting bar from a tree branch.
First, I cut a branch off one of my trees.
When looking for a branch, try to find one that has a 1″ diameter, and cut the branch to 44″ long. I then screwed this into my coop.
 a Chicken Coop" width="800" height="800" />
Finally, for the coop ramp. I took an offcut from the previously used OSB and cut a piece to measure 32”x11”. I then added a base block and four steps.
Congratulations, your chicken coop is getting very close to being finished. Now you need to strip the coop down and paint the panels in the color of your choice.
This is a really easy and fun stage!
You can choose any color you like, just make sure the paint is suitable for outside use.
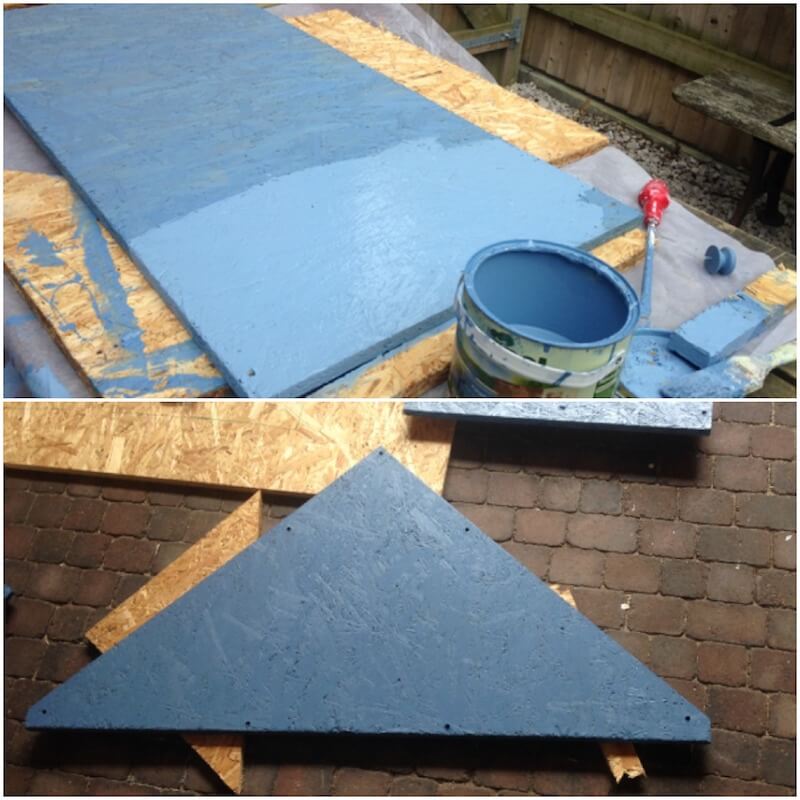
I went with a multi-surface weather shield which guaranteed 6 years of weather protection.
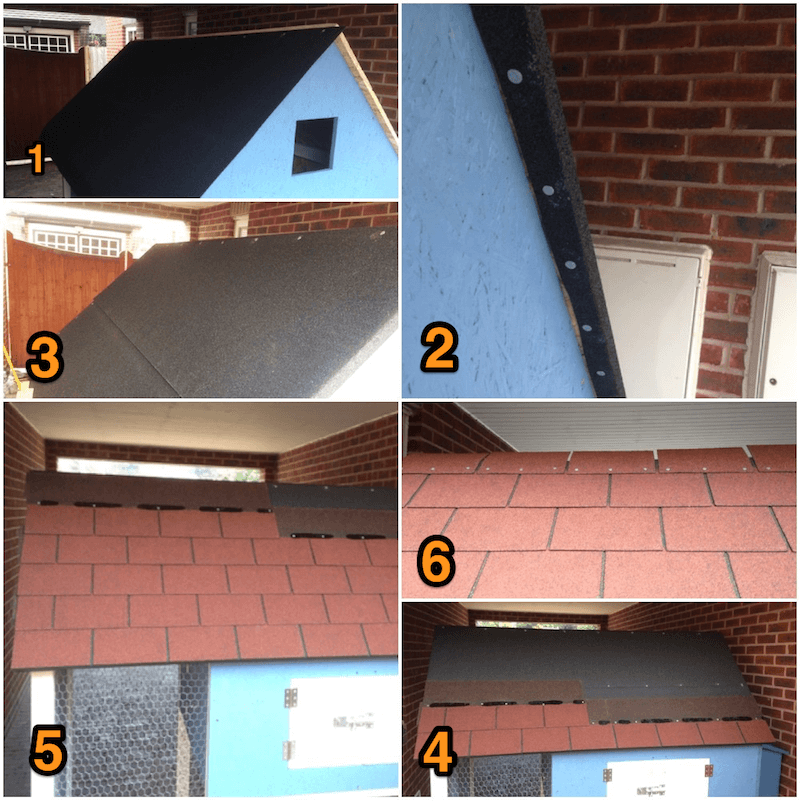
Your coop is really starting to take shape now! You are now going to felt and shingle your roof.
Start by felting one side of the roof.
Once you’ve nailed the top of the felt down, you can nail the right and left sides of the felt down, spacing the nails approximately every 10 inches.
Now you have finished felting one side of the roof panel, you need to take the second piece of roofing felt and repeat this process to felt the right roof panel.
Once the second piece of felt is nailed in place, you will notice that the ridge of the roof is still not covered in felt. You need to take your third piece of roofing felt and place this over the middle of the roof.
 a Chicken Coop Roof" width="800" height="801" />
At this point your chicken coop roof is waterproof, so if you’re on a limited budget you can leave the roof like this. However, I decided to add roof shingles to make it look nicer.
After you’ve finished painting, to fence your coop use either hardware cloth or chicken wire.
I purchased galvanized chicken wire which was 24″ tall and 25 feet long.
Proceed by fitting mesh to each part of the frame which doesn’t have a panel or door.

Use wire cutters to cut the piece of mesh from the roll and U-nails to fix it to your coop. You now have a finished home for your hens!
We get asked many questions about chicken coops and building them, here are some of the most frequent ones that will help you before you start your project.
Q. How big should my chicken coop be?
A. This depends upon the type of breed you plan to keep, however, for beginners, a good guide is to use three square feet per hen inside the coop.
Q. How much space do I need for 12 hens?
A. The rule of thumb is a minimum of three square feet per hen inside the coop and 25 square feet outside of the coop. So for each hen, plan to have roughly 30 square feet.
Q. What is a perch (roost) and what is normally inside a coop?
A. Inside a chicken coop there are multiple living areas; a perch, entrance and a nesting box. The perch is a roosting area inside the coop where your hens will sleep and shelter from the elements. This needs to be 10 linear inches per hen.
Q. How big should I build a nesting box?
A. Another rule of thumb, 1 square foot per hen nesting.
Q. Do I need to padlock my coop?
A. A lock keeps predators out of your hen house. A padlock should be used on every opening in your coop (e.g. entrance, nesting box, cleaning hatch) to keep all predators out.
Q. Should I insulate/heat a chicken coop?
A. Unless you live in remote parts of Canada or Alaska then your chickens will be fine without insulation. Your flock is much more winter hardy than you and they will flock together to keep each other warm.
Q. Should I install an automatic chicken coop door?
A. Yes Automatic Chicken Coop Doors are a great invention and can save you many hours of sleep and protect your flock from predators at night.
Let us know in the comments below if you have built your own coop…